By Ian Paul
Windows Expert, about.com
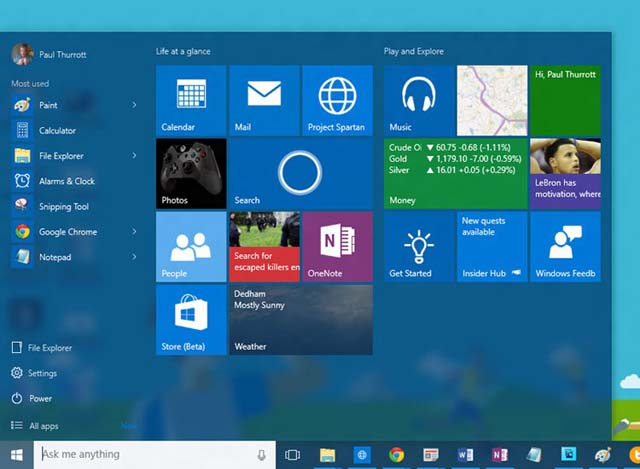
The Windows 10 Start menu is unlike previous versions in Windows.
The basic concept is the same since the Start menu is still where you
go to shut down the PC, or access your programs and system utilities.
But Microsoft added a new dimension to the Start menu with the addition
of Windows Store apps and live tiles on the right side.
This is
actually the only side of the Start menu that is completely
customizable. You can group apps and desktop programs by categories you
create, or decide to use only Windows Store apps with live tiles to get
information on-the-fly.
Adjusting the Start menu
The first
thing you might want to do is change the size of your Start menu. By
default, the Start menu is a little wide, and not the more narrow column
most of us are used to from Windows 7, Vista, and XP.
If you prefer the column, click the Start button and then hover your mouse over the far-right side of the Start menu until your cursor turns into a double arrow.
When you see the arrow, click and move your mouse towards the left. The Start menu will now be in a more recognizable size.
Grouping the menu
When you first start-up Windows 10
there are already some groups that Microsoft starts you off with. You
can keep these as-is, edit the name, change the apps, re-order the
groups, or delete them entirely. It's up to you.
Let's start with moving our groups around. Click Start
and then hover over a group title bar such as "Life at a glance." To
the right of the group title you'll see an icon that looks like an
equals sign. Click on that and then drag to move the group to a new spot
in the Start menu. You can really click anywhere on the title bar to
move it, but I prefer to focus on the icon on the right since it's an
easy way to understand what I'm doing.
If you want to change the
name of your app group, click on the title. When you do that part of the
title bar will turn into a text entry box. Delete what's in there by
hitting Backspace, type in your new title, hit Enter, and you're done.
To remove a group you have to remove every app inside it and then it will delete automatically.
Adding and removing apps
There
are two ways to add apps and desktop programs to the right side of the
Start menu. The first way is to drag-and-drop from the left side of the
Start menu. This can be from the "Most used" section or the "All apps"
list. Drag-and-drop is the ideal method for adding new apps and tiles
since you can control which group an app will be added to.
The other method is to right-click an app--again on the left side--and select Pin to Start
from the context menu. When you do this, Windows will automatically add
your program as a tile to a new group at the bottom of the Start menu.
You can then move the tile to a different group if you prefer.
To remove an app tile, right-click it and select Unpin from Start.
Live tiles in the Start menu
Any
program you add to the Start menu appears as a tile, but only Windows
Store apps can support the live tiles feature. Live tiles display
content from within the app such as news headlines, the current weather,
or the latest stock prices.
When choosing to add Windows Store
apps to your Start menu it's important to think about where to place
tiles with live content. If you like the idea of hitting the Start menu
to quickly get the weather then make sure you place that tile in a
prominent spot on your Start menu.
You can even change the tile's size if you want to make it more prominent. To do this, right-click the tile and select Resize
from the context menu. You'll have several choices for sizes including
small, medium, wide, and large. Each size is not available for every
tile but you will see some variation of these options.
The small
size does not show any information, the medium size will for many apps,
and the large and wide sizes definitely do--as long as the app supports
the live tiles feature.
If there's an app you don't want displaying live tile information, right-click it, and select More > Turn live tile off.
Those are the basics of the right-side of the Start menu. Next week we'll take a look at the left side.


